Unlock the Secret to Flavorful Brown Gravy: No Drippings? No Problem!
Gravy, that luscious, savory elixir, is often considered the crowning glory of many meals, from holiday feasts to comforting weeknight dinners. Yet, for many home cooks, crafting a truly spectacular gravy from scratch can feel daunting, primarily due to the misconception that it absolutely requires those elusive pan drippings from a roasted turkey or beef. What if we told you that creating an incredibly flavorful and silky-smooth brown gravy is not only achievable without drippings but can also be incredibly easy and ready in under 10 minutes? Welcome to the world of truly easy brown gravy, a culinary game-changer that utilizes simple pantry staples to deliver gourmet results. This article will guide you through the process of making a rich, savory brown gravy that rivals any traditional version, proving that exceptional flavor doesn't have to be complicated. Forget the bland, packaged mixes; once you master this homemade gravy, your taste buds (and your guests) will thank you. Perfect for Thanksgiving, Christmas, or any occasion that calls for a touch of culinary magic, this recipe promises to be your new go-to.Crafting the Perfect Base: The Golden Roux and Aromatic Boost
The foundation of any great gravy starts with a well-made roux. A roux, a classic French thickening agent, is simply a cooked mixture of fat and flour. In our case, we’ll use butter for its rich flavor and golden hue. This crucial step is where the depth of your gravy truly begins, and it’s surprisingly straightforward. To start, you'll need a medium saucepan and a whisk. Melt 3 Tablespoons of unsalted butter over medium heat. Once the butter is fully melted and slightly shimmering, whisk in 3 Tablespoons of all-purpose flour. It’s essential to whisk continuously to prevent lumps and ensure the flour cooks evenly. This initial stage is vital not just for thickening but also for flavor development. You want to cook the roux for 1-2 minutes until it transforms from a pasty white to a pale golden or light brown color. This process cooks out the raw flour taste and adds a subtle nutty undertone, contributing significantly to the gravy's overall complexity. Now for our "no drippings" secret weapons: the aromatic powders. While traditional gravy relies on meat drippings for a savory punch, we’ll introduce instant flavor with 1/2 teaspoon of onion powder and 1/2 teaspoon of garlic powder. Whisk these into your golden roux. The beauty of using powders is their ability to distribute flavor evenly throughout the gravy without the need for sautéing fresh ingredients, streamlining your process even further. These humble spices provide a profound savory depth that beautifully mimics the umami notes typically found in meat drippings, making this easy brown gravy a truly remarkable alternative.From Liquid to Luminous: Building Flavor and Silky Texture
With your flavorful roux base established, it’s time to transform it into a luscious gravy. This stage requires a bit of patience and a steady whisk, but the results are well worth the effort. The key here is gradual addition and continuous stirring to achieve that coveted silky-smooth texture without any dreaded lumps. Slowly begin to pour in 2 cups of low sodium beef broth, adding just a small splash at a time, especially at first. As you add each splash, whisk vigorously until it's fully incorporated and the mixture is smooth before adding more. This controlled approach allows the flour in the roux to fully hydrate without clumping, ensuring a perfectly smooth gravy. Once you have a lump-free consistency after adding the initial small amount, you can gradually add the remaining broth, continuing to whisk constantly. Bring the mixture to a gentle simmer over medium heat, continuing to whisk occasionally. As the gravy heats, you’ll notice it beginning to thicken. Allow it to simmer for 3-5 minutes, or until it reaches your desired consistency. Remember, gravy will thicken further as it cools, so aim for a slightly thinner consistency than your final goal. To truly elevate this homemade gravy to restaurant quality, consider a chef-inspired finishing technique known as "monter au beurre." Just before serving, remove the gravy from the heat and whisk in an additional 1 Tablespoon of cold unsalted butter. The cold butter, when whisked in at the end, emulsifies with the hot liquid, adding an incredible richness, a beautiful sheen, and that coveted velvety mouthfeel that sets exceptional gravy apart. Taste and adjust seasoning with salt and freshly ground black pepper as needed. A dash of Worcestershire sauce, while not in our core five ingredients, can also add another layer of savory depth if desired.Mastering Your Gravy: Tips, Tricks, and Troubleshooting
Even with an easy brown gravy recipe, a few common concerns can arise. Here’s how to troubleshoot and ensure your gravy is perfect every time:- Preventing Lumps: The golden rule is slow addition of liquid and vigorous whisking. If you do end up with a few stubborn lumps, don’t despair! You can carefully pour the gravy through a fine-mesh sieve or use an immersion blender directly in the pot for a quick fix.
- Adjusting Consistency:
- Too Thick? Simply whisk in a little more beef broth or hot water, a tablespoon at a time, until it reaches your desired consistency.
- Too Thin? While this is less common with a properly made roux, if your gravy needs further thickening, create a quick slurry. Whisk together 1 teaspoon of cornstarch or flour with 1 tablespoon of cold water until smooth. Gradually whisk this slurry into your simmering gravy and cook for another minute or two until it thickens.
- Reheating Gravy: Gravy will naturally thicken as it cools. To reheat, gently warm it on the stovetop over low heat, stirring frequently. If it’s too thick, whisk in a splash of water or beef broth until it's smooth and flowing again. You can also reheat in the microwave in short bursts, stirring well between each interval.
- Storage: Store leftover gravy in an airtight container in the refrigerator for 3-4 days. It can also be frozen for up to 3 months, though the texture might be slightly less smooth upon thawing and reheating.
Achieving a truly Mastering Brown Gravy: Silky Smooth, No Drippings Required is about understanding these simple principles.
Beyond the Holidays: The Versatility of Homemade Brown Gravy
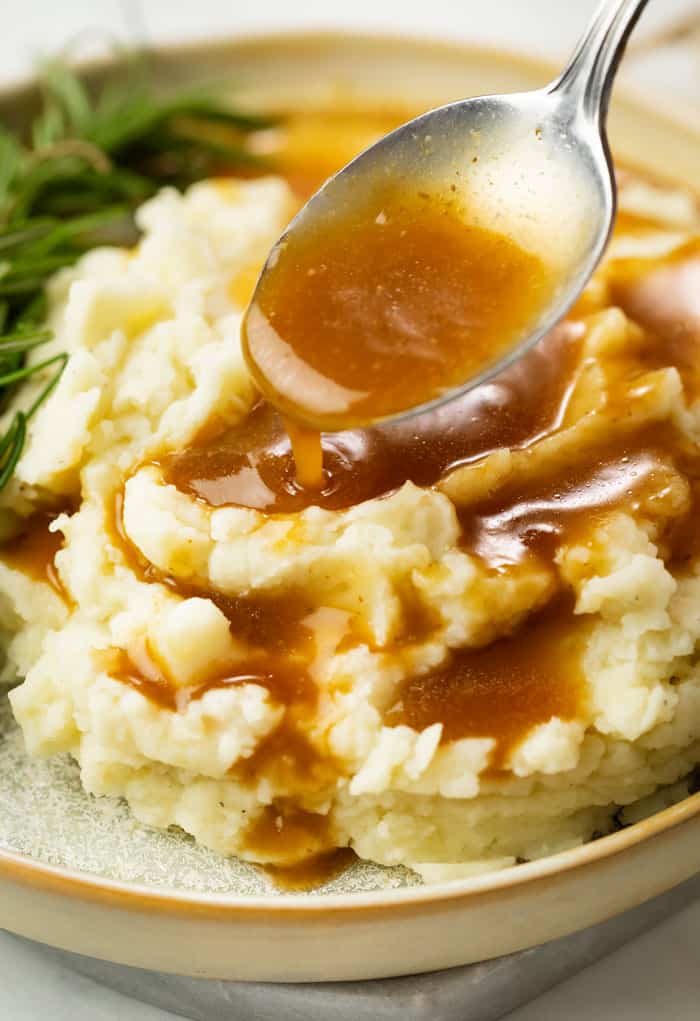
While this easy brown gravy recipe is undeniably a star alongside your Thanksgiving turkey or Christmas roast, its simplicity and incredible flavor make it a fantastic addition to countless other meals. Don't relegate this culinary gem solely to special occasions! Think beyond the traditional:- Classic Comfort: Drench creamy mashed potatoes, serve it with country-fried steak, or smother grilled pork chops.
- Breakfast & Brunch: Elevate a plate of buttermilk biscuits or enhance a savory breakfast casserole.
- Global Inspiration: Use it as the essential topping for Canadian poutine, transforming crispy fries and cheese curds into an indulgent delight.
- Weeknight Wonders: Pour it over roasted chicken or beef, accompany roasted root vegetables, or even use it to create hot open-faced sandwiches.
